Save More Sale 2024 - Save Up To 18%*


STORE LOCATION Store Location: 

☎  NEED ASSISTANCE? CALL 0800 281 182 OR SELECT A BRANCH  ▼
Select Model
  • Austin-Healey 100-3000
  • Jaguar
  • MGA
  • MGB
  • MGF
  • Mini
  • Minor
  • MX-5
  • Spitfire
  • Sprite & Midget
  • T Type
  • TR2-4A
  • TR5-6
  • All products
  • All tools
  • All Dynolite Oils


Tim's MX-5 Project Part 2: Rust


Blog profile Image

By Tim White
December 15 2017

Tim's MX-5 Project: Part 2 - Rust


Part 2 will be heavy on pictures and light on words for obvious reasons. When we last left off, the plan was to get stuck into the rust repairs on the car and make sure it would survive this coming winter. Well, as with any older car, rust is always a concern but is almost always worse than it looks..!


Driver's side.
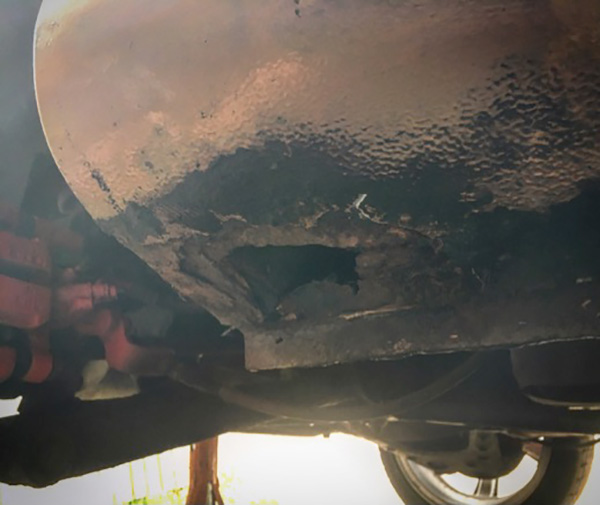
Tim's MX-5 Project image 01

Credit: By Tim White @mosseuropeltd


Passenger's side.
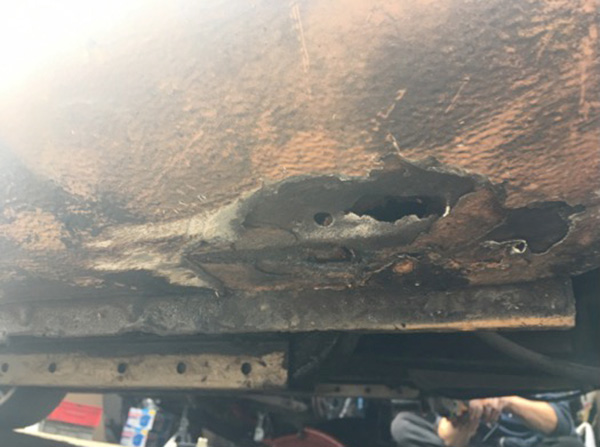
Tim's MX-5 Project image 02

Credit: By Tim White @mosseuropeltd


Now on the surface neither of these looked too bad. But when you start cutting into the car to find where the bad stuff ends and the good stuff begins, you end up being left with a pretty sizable hole..!


That'll be all three skins on the driver's side then..!
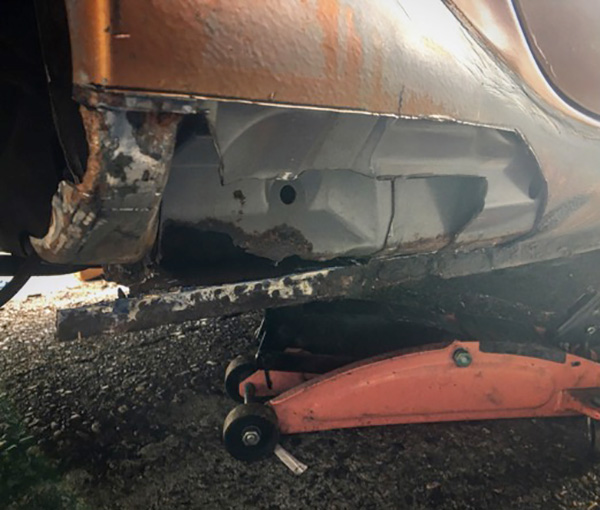
Tim's MX-5 Project image 03

Credit: By Tim White @mosseuropeltd


...and all three on the passenger side as well..!
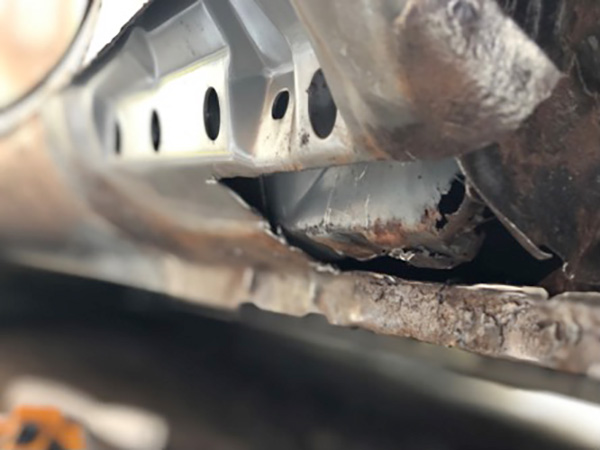
Tim's MX-5 Project image 04

Credit: By Tim White @mosseuropeltd


So both sides needed a fair bit of work! The driver’s side clearly the worse of the two, but fortunately both were well on the right side of 'salvageable' especially for a DIY-er who’s skilled with a welder. Thankfully, my very good friend Robert is just that person and has a fair bit of experience welding up MX-5s himself. He’s the proud owner of a VERY early NA6 in Mariner Blue which like most cars of its age, has needed some TLC in the form of sheet metal and welding wire. So Robert is definately the right person for the job.

With Robert recruited, it was time to hit the shelves at Moss and pickup some supplies in the form of:

With that, some welding gas, a few power tools and some courage, we went to work.
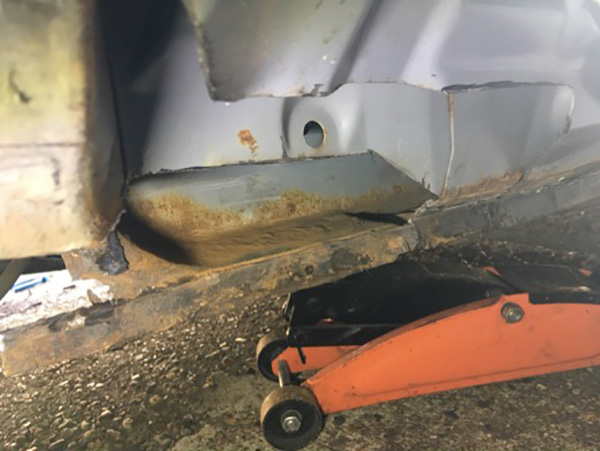
Driver's Side:
The first thing was to cut out all of the rusted out metal, stopping where the metal was still solid but with a little surface rust. This was then treated with a converter and sealant.

Tim's MX-5 Project image 05

Credit: By Tim White @mosseuropeltd


First layer patched up with matching gauge metal cut to shape.
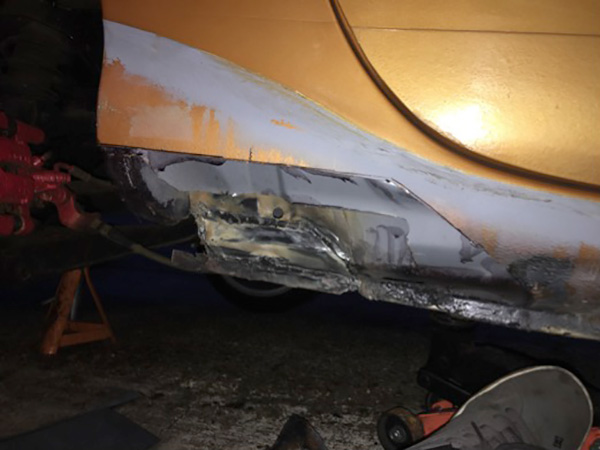
Tim's MX-5 Project image 06

Credit: By Tim White @mosseuropeltd


Second layer patched and shaped.
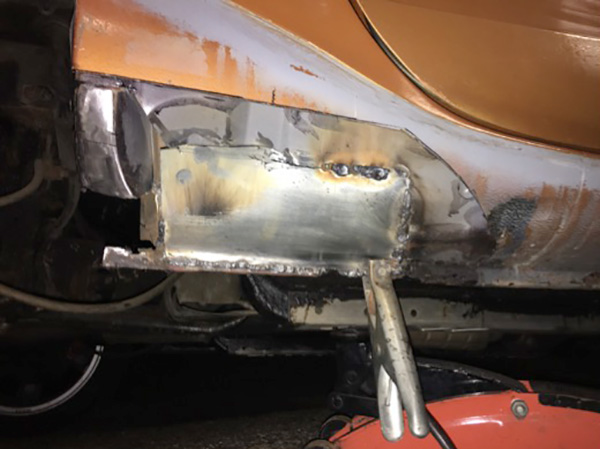
Tim's MX-5 Project image 07

Credit: By Tim White @mosseuropeltd


Third layer grafted, sealed and reshaped (green goo will be explained shortly).
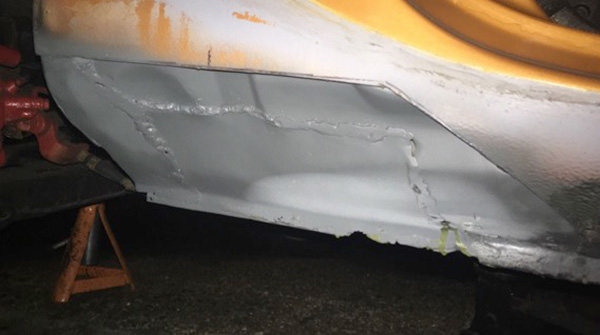
Tim's MX-5 Project image 08

Credit: By Tim White @mosseuropeltd


Outer skin and repair panel grafted in and coated.
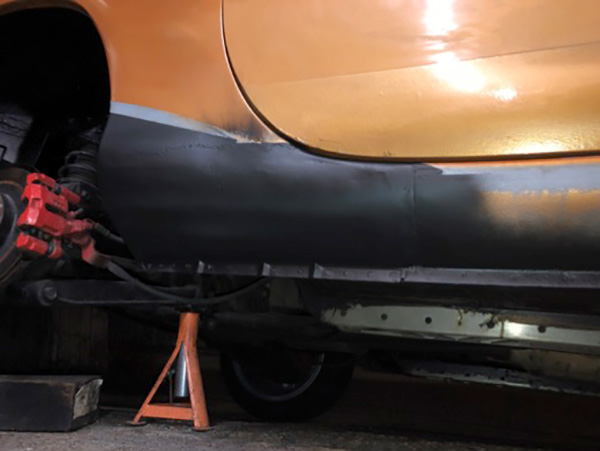
Tim's MX-5 Project image 09

Credit: By Tim White @mosseuropeltd


'Whilst we’re in there' undersealing/protecting as much as possible.
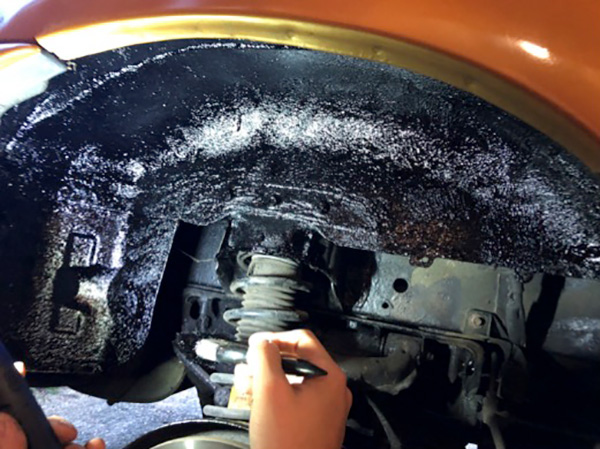
Tim's MX-5 Project image 10

Credit: By Tim White @mosseuropeltd


Passenger's Side:
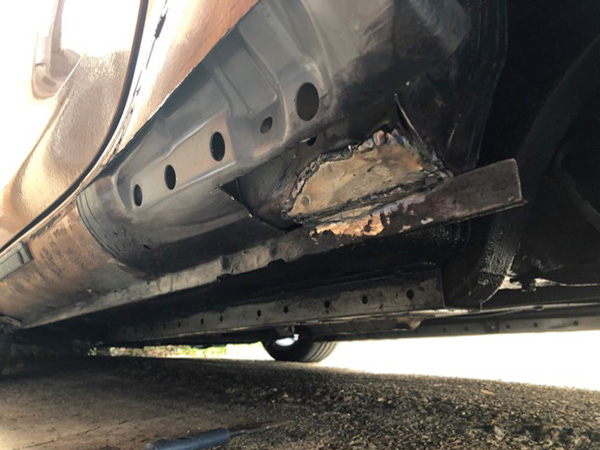
Layer 1 cut, shaped and welded.

Tim's MX-5 Project image 11

Credit: By Tim White @mosseuropeltd


Layer 2 cut, shaped and welded.
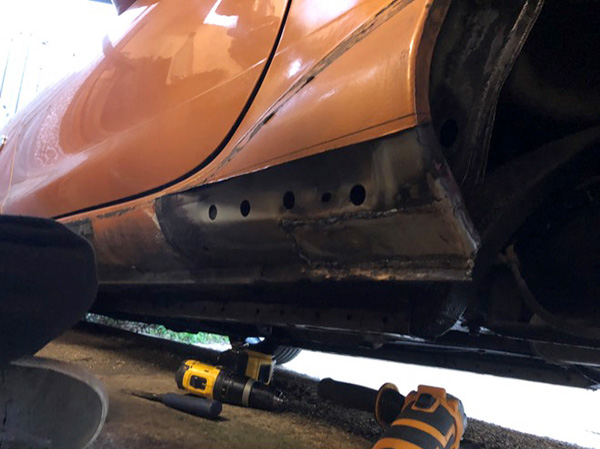
Tim's MX-5 Project image 12

Credit: By Tim White @mosseuropeltd


Outer skin repair panel grafted on.
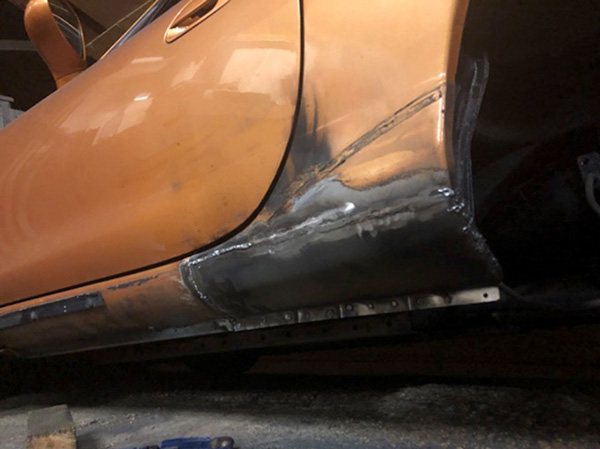
Tim's MX-5 Project image 13

Credit: By Tim White @mosseuropeltd


The eagle-eyed among you will notice that we didn’t exactly take the best of care when it came to protecting the paint on the car. Ultimately, the car needs paint in the future anyway, so for now the priority is function over form. It’s not the prettiest flower in the bush, but at least she’s solid, and the paint we put down will seal the metalwork up for the winter.

Now the final step is actually one that was carried out incrementally throughout the four weekends of work this all took; cavity protection. The Eastwood frame coating spray comes with this super useful spray-nozzle on the end of about a 1.5m hose. Allowing you to get inside all the inspection holes, and coat all the metalwork with a combined rust-preventative and sealer which will hopefully stop future rust from digging its claws in (or even starting in some cases). It’s also bright green, which makes checking your work after the event quite easy! I ended up using four cans in total. One per sill giving a nice thick coat on each layer (inspection holes between the layers means I was able to coat everything we worked on), and one for each chassis leg to hopefully keep them in the nigh-on-factory condition they’re in now.


Spraying the driver's side inner sill.
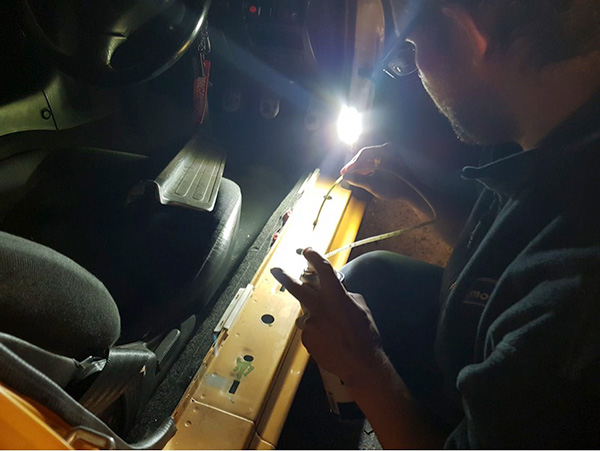
Tim's MX-5 Project image 14

Credit: By Tim White @mosseuropeltd


Checking coverage once dry.
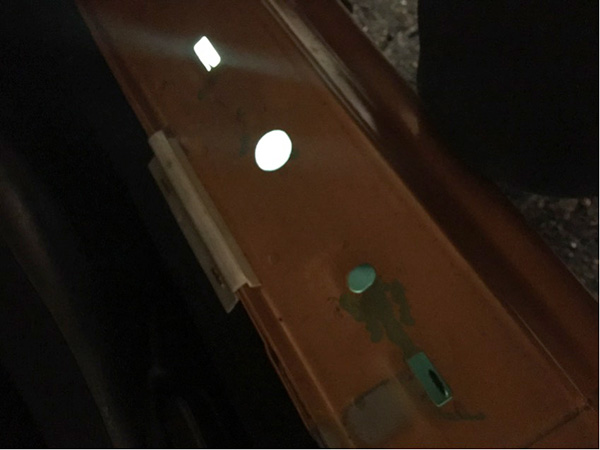
Tim's MX-5 Project image 15

Credit: By Tim White @mosseuropeltd


Exhaust & MoT
With all that done, it was time to get an MOT booked. As per the law of sod, two days prior to my booking an MoT, the backbox started blowing, so I was going to have to address that asap! I’ve been a fan of the Cobalt backboxes long before I started working at Moss, so it was a no-brainer knowing that it’d give a nicer note than the stocker, as well as not be so intrusive as to cause drone on the motorway, or fail noise regs at any tracks in England. I ended up going with a single-tip version (part number 900-565) for the time being (future bumper cut may dictate me swapping it out for a twin-tip, but that’s for another day), along with a new set of exhaust mounts (part number 901-905) knowing that the ones on the car would likely be perished! So after work, got the back of the car in the air, and went to work.


Out with the old.

Tim's MX-5 Project image 16

Credit: By Tim White @mosseuropeltd


And in with the new!
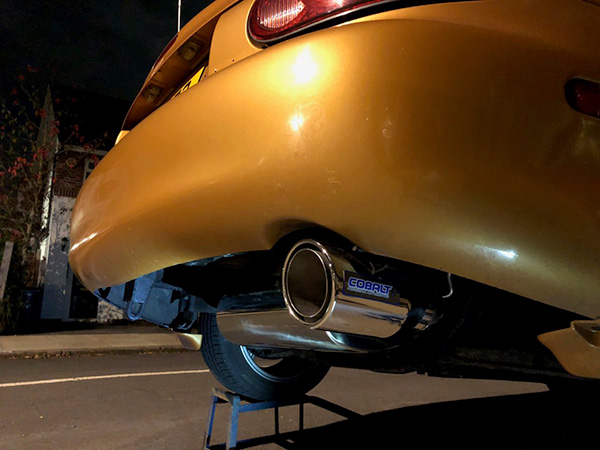
Tim's MX-5 Project image 17

Credit: By Tim White @mosseuropeltd


Just in the nick of time, MoT tester checking out our handywork the following day!
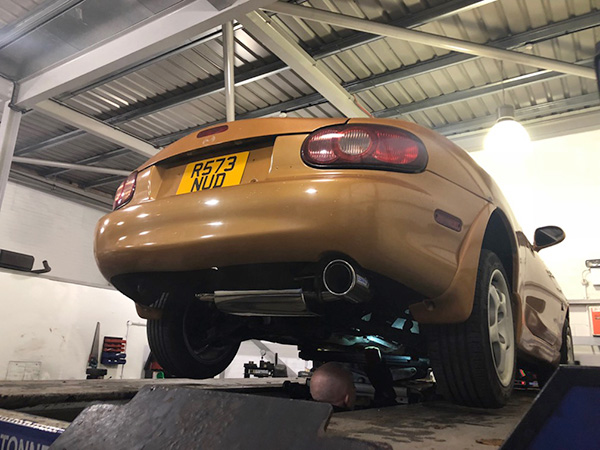
Tim's MX-5 Project image 18

Credit: By Tim White @mosseuropeltd


Conclusion & The Future
I’m very pleased and proud to report that the car passed its MoT with flying colours. There are a few areas I’d like to revisit in the new year that can be improved on, but for the time being, this is another car that’s saved from the knackers yard where it would of undoubtedly ended up with the state I bought it in.

In 'Cobalt tradition' the exhaust has bedded in quite nicely and gives the car a nice little note and a bit more character (something the car was sorely lacking). Also the placebo effect has kicked in quite nicely, giving the car at least another 10 hp or so!

Next? Well the next big undertaking will be sorting out cooling on the car. The rad is a little tired and discoloured, and the fans are a little temperamental. Given I’ve got a 600 mile trip to Paris over the holiday break, I should probably get a move on with that sooner rather than later!


Find more from Tim on Instagram @timbomfg


Read more blogs from Moss Europe


Keep up with all the latest from Moss Europe on our social pages.

Moss Europe Social Pages

Moss Europe Facebook Page Moss Europe Instagram Page Moss Europe Twitter Page